
FAQ’s
| FEATURES | PAVER BLOCKS | REINFORCED CEMENT CONCRETE (R.C.C.) | BITUMEN (ASPHALT) |
| Life Expectancy | >20 years | >20 years | 5-10 years (with frequent resurfacing) |
| Initial Cost | Medium | High | Low |
| Construction Time | Medium as pavers are laid manually. After construction immediate use is possible. | Very High as after construction 15-20 days required for curing | Low. After construction, use possible within 1-2 days. |
| Rainwater Drainage | Permeable Pavers allow water to pass through to the base thereby reduce pooling or flooding in heavy rain | Surface is impermeable and drainage must be achieved by proper surface camber and slope. | Surface is impermeable and drainage must be achieved by proper surface camber and slope. |
| Safety | Good slip and skid resistance, helps reduce braking distances. | Prone to slippage and skidding during rain and due to spills. | Good traction and skid resistance. |
| Surface Cracks | Not affected by rainwater or thermal heat of expansion (due to small unit size and mass). | Prone to cracks due to large thermal mass (which requires provision of expansion joints) and due to poor base preparation. | Heavy rains, extreme temperatures and wear and tear result in cracks and rutting leading to potholes. |
| Repairs | Easy, fast, and inexpensive as even a single paver block can be removed, and re-laid/ replaced. Repaired area is available for immediate use. | Difficult, time consuming and expensive as whole concrete slab may have to be replaced and re-cast. | Cracks, potholes can be repaired inexpensively and quickly by patch work. But repaired area is often not durable due to poor work quality. |
| Reuse | Same blocks can be removed and reinstated after repairs. | Cannot be reused but can be crushed for recycling. | Cannot be reused but can be crushed for recycling. |
| Quality | Factory produced in large volumes to meet stringent specifications and Indian Standards for strength, water absorption, abrasion resistance and dimensional tolerances. | Cast at site and hence dependant on quality of concrete and compaction at the site. | Since asphalt is a flexible pavement, its strength relies heavily on the subgrade, subbase and base materials being well compacted and the right material. |
| Environmental Issues | Paver block usage has no harmful effects on the environment. | Concrete pavement construction has no harmful effects on the environment. | Process of melting bitumen creates greenhouse gases that contribute to environmental pollution. |
| Criteria | WET CAST (RUBBER/PVC MOULDED) PAVER BLOCKS | VIBRO/HERMETIC PRESS (STEEL MOULDED) PAVER BLOCKS |
| Mfg. Process Description | Usually completely manual process. Each individual paver block mould made of rubber/pvc is manually filled with wet concrete, passed over a simple vibrating table and left to cure in the mould for one day. Next day, each paver block is removed from its mould and after further curing, a lacquer coat may be applied. | Usually fully automatic production process. Starts with weigh batching of aggregates and cement for mixing, then automated filling of concrete in steel moulds with compaction under hydraulic pressure (Hermetic Press) and along with synchronized vibration (Vibro Press), followed by movement to curing, packing, storage and truck loading. |
| Where Used | Mainly for Non/Light traffic areas for pedestrians, parking lots or residential driveways; typically, small projects of area 1500-2000sq.m. | High wearing areas and for long durable finish e.g. roads, ports, etc. Large projects can be easily and conveniently executed due to larger capacities of automated plants. |
| Quality consistency | Poor consistency in product, with high variation in finish, sizes, and densities/ strengths due to manual production process. | Much better consistency owing to use of automatic machines for production. |
| Production quantity | Daily production output is limited by availability of labour, moulds and space for drying of material, weather conditions etc. Usually less than 400-500 sq.m. per day. | Daily production output significantly less dependent on external factors such as labour, moulds or space availability. Results in higher reliability of output, with large plants capable of producing up to 1500-2000 sq.m. per day. |
| Looks | Better looks initially and dark colours are obtained | Looks very consistent over years of usage |
| Process Reliability | Low reliability of process- Shade, strength, and dimensional variation likely to be more | Reliable process- Lowest variations in product. |
| Slip Skid Resistance | Lower | Higher |
| Durability | Lower durability of surface finish | Fair durability of surface finish |
| Criteria | WET CAST (RUBBER/PVC MOULDED) KERBS | VIBRO PRESS (STEEL MOULDED) KERBS |
| Mfg. Process Description | Usually completely manual process. Starts with Manual Drum Mixer being used for mixing the Concrete. Then each individual Kerb mould, made of rubber/PVC, is manually filled with wet concrete, passed over a simple vibrating table and left to cure in the mould for one day. Next day, each Kerb is removed from its mould and kept for further curing before despatch. | Usually fully automatic production process. Starts with weigh batching of aggregates and cement for mixing, then automated filling of concrete in steel moulds on the Vacuum Wet Press with compaction under hydraulic pressure and water suction by vacuum, followed by movement to curing, packing, storage and truck loading. |
| Physical Parameters | Concrete Density is lower between 2100 -2200 kg/m3 due lack of hydraulic compaction resulting in voids and lower Compressive Strength around 15N/mm2. | Higher concrete density between 2300 – 2400 kg/m3 due to large hydraulic pressure with vacuum suction of water resulting in negligible voids and higher Compressive Strengths around 35N/mm2. |
| Quality consistency | Poor consistency in product, with high variation in finish, sizes, and densities/strengths due to manual production process. | Much better consistency owing to use of fully Automatic Vacuum Wet Press for production. |
| Production quantity | Daily production output is limited by availability of labour, moulds and space for drying of material, weather conditions etc. and is usually limited to 100-200 pcs. per day. | Daily production output significantly less dependent on external factors such as labour, moulds or space availability. Results in higher reliability of output, with Automated Presses capable of producing 1000 pcs. per day. |
| Looks | Better looks initially and dark colours are obtained | Looks very consistent over years of usage |
| Process Reliability | Low reliability due to manual process resulting in higher variations in dimensions, strength, and colour shades. | Reliable process due to automation resulting in low product variation. |
| Durability | Lower durability of surface finish | Fair durability of surface finish |
| # | NATURAL GRANITE / KOTA STONE | CEMENT CONCRETE FLAG STONE |
| 1 | Granite/Kota Stones are slippery, particularly under wet conditions. Kota Stones are also uneven. | Concrete Flag Stones are uniform, have an even surface and are non-slippery under wet conditions. |
| 2 | Kota Stone is available only in one colour, i.e. greenish colour. Granite is available in various colours depending on its origin and hence with significant variation in cost. | Concrete Flag Stones can be manufactured in various colours like Dark Grey, Red, Yellow, Brown, as per choice. In fact, internationally, Concrete Flag Stones are used with different colours for superior aesthetics. |
| 3 | Granite/Kota Stones are mined naturally and hence there is no uniformity or consistency in their colours and shades. | Since Concrete Flag Stones are coloured by adding colour pigments to the concrete mix, there is uniformity in their colours and shades. |
| 4 | Granite/Kota Stones are brittle which results in cracks due to heavy moving loads or if heavy items fall on them. Besides, they cannot be obtained in high thicknesses. | Concrete Flag Stones are produced with high uniform density in a Vacuum Wet Press resulting in high strength and are unlikely to crack even under heavy loads. Besides, they can be produced up to 80mm thickness for heavy duty applications. |
| 5 | Granite and Kota Stones are mined products, mostly it in forest areas. Thus, it is not environmentally friendly. | Concrete Flag Stone is environmentally friendly, as mine waste like quarry dust and stone aggregates are mixed with cement to produce a useful product. |
| 6 | Kota Stones need to be edge-cut before installation resulting in a lot of debris which need to be disposed at the site. | Concrete Flag Stones are moulded and finished in a Vacuum Wet Press with great dimensional accuracy. They require no cutting or any resulting debris. |
| 7 | Kota Stones need to be polished after installation, which requires skill and is very time consuming. This requires longer construction time and usually results in delays. In addition to this, a lot of waste sludge is formed during polishing which needs to be disposed off at site, creating further difficulties. | Concrete Flag Stones are precast pre-finished products which do not need polishing. Installation is very quick resulting in faster work completion and better finishing schedules without problems of sludge disposal. |
| 8 | Granite/Kota Stones are available in limited geographies and need to be transported to various locations from there resulting in substantial transportation costs. | Concrete Flag Stones are produced all over India, such as Delhi, Mumbai, Bangalore, Hyderabad, etc. and can be delivered to various locations at lower costs. |
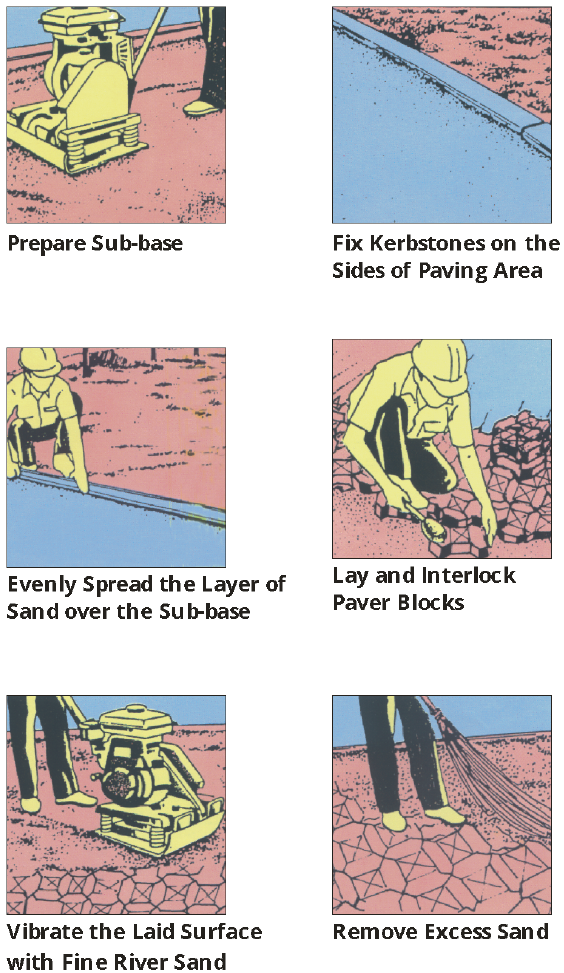
PAVER BLOCK INSTALLATION
The following guideline is an overview of the proper steps involved when installing interlocking concrete paver blocks where no special circumstances are present. (Reference Standard: IS 16777:2019 Laying of Paver Blocks — Code of Practice)
CONTRACTOR : We recommend that an experienced contractor installs the Paver Blocks. To achieve the best results from your pavers it is recommended that your base preparation, bedding layer and grouting be specified by a qualified engineer. The paving installation should be done by a Paving Contractor who is familiar with the installation of Paver Blocks.
It is important to consider the following steps to ensure a successful outcome: 1. BASE PREPARATION:
It is critical to the long-lasting stability of your paving that the supporting base for your paver blocks be properly constructed. The four main aspects of the base preparation are:
a) Drainage : Good drainage prevents the accumulation of sub-surface water underneath the paved area known as sub-surface ponding.
- The excavated surface should have a fall (minimum 1:50) so that any moisture will flow to a drainage point.
- It is recommended that the top of the paving is a minimum of 75mm below the damp proof course of the building.
- Place a plastic membrane against any exposed foundation.
b) Sub-Grade : The sub-grade is the upper part of the soil, natural or constructed, which supports the loads transmitted by the overlying paving.
- All vegetation and topsoil must be removed.
- Must be well drained and compacted.
c) Base-Course : The base-course is the foundation for the paver blocks.
- The base-course should be made from gravel or G5 and can be stabilized using cement.
- Varies in thickness between 50mm and 120mm depending on the type of sub-grade and whether the paved area is for a footpath or driveway.
- Footpath paver blocks can be laid without a base-course where the sub-grade material is compact and uniform.
- The compacted surface should be tight or close knit to prevent migration downwards of the bedding course material.
d) Bedding Course : The layer that the paver blocks rest on. Well graded, washed river sand is used as a bedding course material for paving.
- Between 20mm and 25mm thick.
- Carefully screened (level) with a straight edge.
- Must be moist when the pavers are placed.
- Cement may be added to the base-course to further stabilize this layer.
2. SETTING OUT:
This is ensuring that your paving pattern stays aligned.
- Use setting out lines (this is a grid of string/nylon lines spaced at exact intervals).
- Constantly re-check your lines in all directions while installing the paver blocks.
- Popular Laying Options :

3. PRODUCT HANDLING:
It is important to minimize damage to paver blocks during transport.
- Transport in an upright position.
- Carry paver blocks by hand to the laying area, underside to underside.
- Cobbles should be transported in a wheelbarrow and be packed and unpacked individually by hand.
4. PAVER BLOCK LAYING:
Paver blocks are designed to resemble natural stone and do have variances in dimensions and colour.
- Product must be drawn from different consignments to ensure blending of different batches.
- Uneven pavers should be rotated to match adjoining pavers or replaced and used for cutting.
- Concrete is brittle. Consequently, it can be expected that up to 5% of the product may be chipped when delivered. This is normally allowed for by the planner when ordering. Chipped products should be used for cutting where possible.
5. CUTTING :
If necessary, paver blocks can be cut to size to fit within constraints:
- With a brick cutting machine, or
- With an angle grinder (with a diamond-tipped blade).
6. EDGE RESTRAINTS:
It is very important to restrain the perimeter of the paving being laid to prevent lateral movement of the pavers under load and the washing out of the bedding sand which will cause subsidence of the pavers on the edge. Good edge restraints are:
- Reinforced concrete
- Kerb stones
- Edge pavers bedded in a concrete base.
7. JOINT FILLING:
There are two types of paving installations, namely rigid and flexible paving. With the rigid installation method, the spaces between the pavers are filled with a wet slurry mix known as grouting. With the flexible installation method, dry sand is swept in between the pavers to secure them in place. Please see details on the joint filling material and their respective installation techniques below:
a) Grouting for a Rigid Installation :
- Products are porous and must be thoroughly wet prior to the application of the slurry to avoid cement staining.
- A 1:3 cement / plaster sand slurry mix is strongly recommended.
- When a slurry is used, ensure that excess grouting is washed off the textured surface with a fine hose spray, or with a sponge immediately.
- Rinse sponge frequently in clean water. Any residue will result in cement staining.
- Freshly grouted paver blocks should not be trafficked.
- Cordoning off the new paving for 7 days, with no pedestrian or vehicle traffic, is recommended.
- Cure the grouting by wetting the paving and joints with a fine spray for a few days after grouting. Keeping the grouting moist will prevent cracks. Beware not to wash the grouting out.
b) Jointing Sand for a Flexible Installation:
- Alternatively, fine plaster sand or building sand may be used to fill the joints between cobbles and paver blocks in driveway applications.
8. COMPACTION OF PAVING
It is recommended that newly laid pavers must be compacted by:
- A light roller compactor with the vibrator switched off. This is the method used for cobbles and pavers.
- A rubber mallet. This is the method used for flagstones.
PICTORIAL REPRESENTATION OF PAVER BLOCK INSTALLATION PROCESS:
Efflorescence is a hazy white residue which occurs naturally on the surface of pavers, hollow/solid blocks, and other concrete products. It occurs when water-soluble salts within the product migrate to the surface and react with carbon dioxide to form calcium carbonate. This is the substance that remains visible on the surface of the products. Efflorescence may be visible when the products are installed or may appear later, seemingly at random.But it is not a product defect and the condition will usually correct itself with time and exposure to the elements. Efflorescence can be cleaned with commercially available cleaners formulated specifically for concrete products. Please refer 'Managing Efflorescence on Concrete Pavers' from the Interlocking Concrete Pavement Institute, USA. (Download PDF)
ORDERING GUIDELINES
- It is recommended that the quantity of Chequered Tiles being ordered should consider 5% wastage on site, due to varying sizes/shapes of areas where tiles are required to be fixed.
- To minimize wastage, limited number of designs should be ordered, so that unutilized tiles in one area can be used in another area.
- As the Tiles are manufactured batch wise, there may be slight differences in colour and design due to varying nature of raw materials. Hence, quantity required for a large area to be tiled should be intimated to the manufacturer in advance so that they can manufacture the complete lot in one batch and minimize variation in colour and design.
STACKING AND SHIFTING GUIDELINES
- Tiles should be unloaded separately batch-wise and placed near the area where they are required to be laid.This will result in minimum handing of material and avoid mixing of different batches of tiles and edge-breakage.
- Tiles are recommended to be unloaded on a levelled surface and area should be covered to protect the tiles from direct sunlight and dust.
- To avoid breakage during storage, tiles should be stacked in the following quantities based on the weight of the different sizes:
Size cm Size inches Recommended Stack Qty. 40 x 40 16 x 16 25 30 x 30 12 x 12 35 25 x 25 10 x 10 45
- While shifting tiles, they should be handled gently, and care taken that tiles do not hit each other or any other material to safeguard the edges and corners from breakage.
- For shifting of tiles to higher floors by hoist, the tiles should be placed horizontally on pallets.
- While removing tiles, complete stacks should be removed, and no tiles should be left over to prevent unnecessary wastage and damage.
INSTALLATION GUIDELINES
1. Precautions:
- It is recommended that the quantity of tiles required for every enclosed or open area should be ascertained and availability checked (Batch wise) to match with the requirement.This will help in minimising shortfall and excess/ wastage of the tiles. The use of different batches of tiles in one area may result in slight difference in colour and design.
- It is strictly advised that the tiles should be installed after the internal and external plastering. Any heavy dumping of material or mixing of mortar on freshly installed tiles will damage or spoil the surface of the tiles.
- The Tiles should be cleaned carefully from all four sides before installation to ensure fine joints.
2. Preparation:
- Base Floor should be cleaned properly by removing any loose or set mortar, unwanted material or dust from it.
- Chequered Tile Flooring work should start from the one side of building compound after fixing kerbstones or any other suitable restraint, which provides a protection boundary to Chequered Tiles.
3. Bedding of Mortar:
- The bedding layer for laying tiles is to be prepared in cement mortar.
- It must be ensured that the base is well compacted and free from all unwanted matters. The surface should be rough to form a suitable key between the base and the mortar bed.
- The bedding must be levelled and laid to slight slope as desired.
- The top of the mortar should be kept rough so that cement slurry can be absorbed to form a bond between the tiles and the mortar.
- The thickness of Bedding Mortar should not be more than 2” to avoid sinking of tiles.
4. Laying Procedure
- The laying of Tiles should commence after the bedding has become sufficiently hard.
- Neat cement slurry should be spread over the mortar bed and tiles should be gently tapped over it, using a wooden hammer to match the top level of the adjoining tiles. The cement sand ratio in cement mortar should be as per IS specification (1:5).
- The joint shall be kept as thin as possible and in a straight line.
- After proper laying of Tiles, the extra cement slurry coming out from the joints must be cleaned thoroughly and Tiles laid should be allowed to set for about 12 Hrs. Next day the joints must be cleaned deep with wire brush and then grouting should be done.
- The joints shall be filled with cement grout of the same shade as the tile matrix colour. Grouting should be done carefully to make sure that grouting material has filled the joints.
- In case of coloured chequered tiles, grouting material should be the same colour as the tiles.
- It is strictly recommended that the no area should be left partly done, as the last row of tiles fixed will have their edges exposed, resulting in not only the edges getting damaged but also the tiles coming loose, if someone were to step on them.
- Under no circumstances should another area be taken up for tiles installation unless the area already taken in hand for installation is completed.
- If the installation area is very large where it is not possible to finish laying in one day, the final row of tiles should beprotected either by putting bricks or weak mortar and next day the work should be started after proper cleaning the edge of last row of tiles.
- After fixing of tiles, the flooring must be kept moist and tiles allowed to set for at least 7 days.
- In case where the edges of tiles are exposed, (for example due to difference in floor levels) the exposed edges of Tiles should be covered with Aluminium or S. S. Angles or any other suitable material which can protect breaking of edges.
| Criteria | STAMPED CONCRETE | PAVER BLOCKS |
| Usage | Relatively newproduct, not popular. | Popular product, proven in performance through wide usage over decades. |
| Availability | Not widely available, limited suppliers. | Widely available with large established body of producers. |
| Quality Standards | No local quality standards. | IS 15658 Specification for Precast Concrete Blocks for Paving, issued by Bureau of Indian Standards,available since 2006. |
| Aesthetics | Many designs and colours possible. | Many colours, finishes and laying patterns available. |
| Application | Limited application for low traffic areas such as swimming pool decks, pathways, private driveways, etc. Not suitable for high wear and tear public footpaths. | Suitable for large variety of applications, from low traffic pathways to public footpaths, parking lots and heavy-duty usage such as Smart Cities, ports, and container terminals. |
| Mfg. Process | Cast and cured at site leading to poor quality control of the concrete. | Machine made, robust, finished product, fully cured in a factory, leading to superior and consistent product quality. |
| Site Laying | Requires skilled workmanship. | Done by widely available, semi-skilled labour. |
| Site Curing | Improper curing after laying at site leads to defects which cannot be rectified (such as footprints of pedestrians/ animals walking on wet concrete before it is cured). | Footpath can be opened for use immediately after laying without holding up for curing; any product or defects can be easily rectified immediately after laying or later. |
| Quality Testing | Difficult to check quality of stamped concrete after it is cast at site. | Paver Blocks can be tested easily at any time even after laying. |
| Abrasion | Top colour layer thickness is 2mm which wears off in high traffic applications, such as public footpaths. | Top colour layer thickness is 6-10mm giving a much longer life for high traffic applications. |
| Underground Utilities | Cannot be accessed after laying without replacing the surface. | Can be easily accessed for maintenance, with same blocks being re-used afterwards. |
| Durability | Prone to cracks which cannot be repaired without replacing the surface. | High durability; blocks if cracked can be replaced individually at any time. |
| Rain Effect | No ground water percolation; leads to water runoff into drains. | Percolation to base and subbase through joints, which can be increased substantially using Permeable Paving. |
| Monsoon Laying | Cannot be carried out during monsoon; surface gets damaged even if it rains within 8-10 hours of stamping | Can be laid even during the monsoon season |
| Cost | Higher cost for given area | Lower Cost for given area |